
Soldering Wire
Welcome to Neo Soldering!
Soldering wire creates the essential electrical and mechanical connections in every electronics project. This metal alloy melts when heated, flowing between components to form strong, conductive joints that power everything from Arduino builds to professional PCB repairs. Whether you’re assembling custom keyboards, fixing game consoles, or reflowing SMD components, the right solder wire ensures reliable connections that last.
Showing all 2 results
-
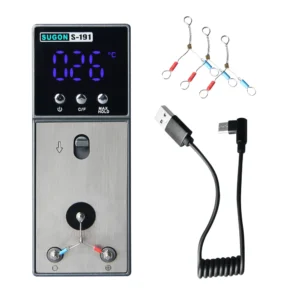
Original price was: £59.00.£44.50Current price is: £44.50.Take control of your soldering accuracy with instant tip temperature...Add to cart
-
Original price was: £22.90.£19.90Current price is: £19.90.Get station-quality temperature control in a portable 104g pen-style iron...Add to cart

Solder Wire for Every Electronics Project
Soldering wire flows between metal surfaces when heated with a soldering iron or hot air tool, creating bonds that conduct electricity and provide mechanical strength. The wire contains flux inside its core that cleans oxidation from surfaces during melting, allowing the solder to wet properly and form solid joints.
Different projects demand different solder types. Lead-free variants comply with RoHS environmental standards and work well for consumer electronics, though they require slightly higher temperatures than traditional tin-lead alloys. The wire diameter you choose affects how much solder flows into each joint—thinner wire gives precise control for delicate SMD work, while thicker wire speeds up through-hole soldering on larger connections.
Understanding these fundamentals helps you select wire that matches your components, tools, and skill level. The correct solder wire paired with proper technique produces joints that withstand thermal cycling, mechanical stress, and years of use.
Lead-Free vs Lead-Based Solder Wire
Lead-free solder wire has become the standard for electronics assembly and repair due to health and environmental regulations. These alloys typically combine tin with small amounts of silver, copper, or other metals to achieve reliable melting and wetting properties. Lead-free solder melts between 217°C and 227°C depending on the specific alloy composition.
Traditional tin-lead solder (usually 60/40 or 63/37 ratios) melts at lower temperatures around 183°C-190°C and produces visually shinier joints. Some repair technicians prefer it for rework on vintage electronics or when working with heat-sensitive components that can’t tolerate the higher temperatures required for lead-free alternatives.
Both types perform well when used correctly with appropriate temperature settings on your soldering station. Lead-free solder creates slightly duller-looking joints that are perfectly functional despite their matte appearance. When switching between solder types, clean your soldering iron tips thoroughly to prevent contamination between different alloys.
Choosing the Right Wire Diameter
Wire diameter directly impacts soldering precision and efficiency. Thin solder wire (0.3mm-0.5mm) gives exact control over solder flow, making it essential for surface-mount components, dense PCB work, and fine-pitch soldering. You can add small amounts of solder exactly where needed without flooding adjacent pads or creating bridges between pins.
Medium diameter wire (0.8mm-1.0mm) handles most general electronics work efficiently. It flows quickly enough for through-hole joints while still offering reasonable control for smaller components. This range works well for Arduino projects, keyboard assembly, console repairs, and typical PCB soldering tasks.
Thick wire (1.2mm and above) speeds up work on larger connections like power supply terminals, thick gauge wiring, and grounding straps. The higher solder volume per length means fewer touches of wire to iron, though it demands careful technique to avoid applying too much solder to smaller joints. Match your wire diameter to your component sizes and the thermal mass of the materials you’re joining.
Flux Core Types and Applications
The flux inside solder wire removes oxidation and contamination from metal surfaces during heating, allowing molten solder to bond properly. Rosin flux is the most common type for electronics work—it activates at soldering temperatures, cleans effectively, and leaves minimal residue that won’t damage circuits or corrode connections over time.
No-clean flux formulations leave behind residue that’s electrically neutral and doesn’t require removal after soldering. This saves time on production work and board assembly where cleaning isn’t practical. The residue appears as a light film around joints but won’t affect performance or reliability.
Water-soluble flux provides aggressive cleaning action for heavily oxidised surfaces or difficult-to-solder materials. After soldering, the flux residue must be washed away with water or isopropyl alcohol since it can attract moisture and corrode connections if left in place. Choose flux type based on your components, whether you can clean the board afterward, and how much cleaning power you need for successful wetting.
Showing all 2 results